


One of the nicest things about summer in New Zealand is the smell of food being cooked on the Barbie! Outdoor dining is what it’s all about, especially after a hard days work around the home and section. Once the food is ready you can choose to sit around one of those posh outdoor tables that every store seems to sell these days or you could park the plate on a table made by yourself. One of the most popular BBQ or picnic tables seen in gardens and parks across the country is the trusty ‘rustic’ fitted seat unit. In this feature I will show you how to build your own. The ‘oldie but goodie’ design is not an original, by any means, it’s simply an amalgam of units I have built and ones I have seen over the years in parks and private gardens.
Because the table is intended for outdoor use it’s important to use either chemically treated timber or timber that has a natural protection against rot, a quiet conversation with the timber yard people at your local hardware store will help you make that choice.
You will require enough timber to allow you to cut the following lengths:
| Description | Size (All in Millimetres) | Quantity | |
| A | Table Top Rails | 765 x 100 x 50 | 3 |
| B | Bench Seats | 2500 x 250 x 50 | 2 |
| C | Bench Seat Supports | 1565 x 100 x 50 | 3 |
| E | Legs | 865 x 100 x 50 | 6 |
| F | Table Top Planks | 2500 x 300 x 50 | 5 |
| H | Centre Rails | 2155 x 100 x 50 | 2 |
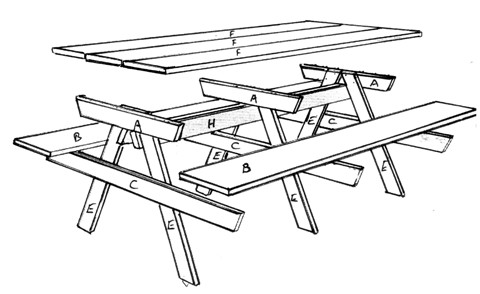
The basic Kiwi BBQ bench.
Figure 1

Cut all timber to the sizes shown sand down any rough spots and edges. Pieces A, E and C require some additional cutting as shown in Figure 2:
Figure 2
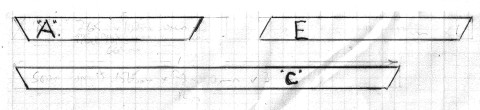
These angle cuts are all 60 degrees that give finished sizes as: A Length 765mm tapering to 665mm. E. Top and bottom edges are 815mm. C. Length 1565 mm tapers to 1465 mm.
Place one each of pieces A (Table Top rails) and C (Bench Seat supports) on a flat surface parallel with each other and approximately 155mm apart. Place two of the legs E on top of these to form a letter “A” shape as shown in Figure 3.
Figure 3
Mark the centres of pieces A and C.
The top inside corners of the legs where they form the top of the triangle shape should be on the centre mark of piece A and the top edges of the legs must be flush with the top edge of piece A.
The legs will now cross the Bench Seat supports (C) with their inside edges approximately 400mm apart, that is 200mm either side of the centre mark on piece C. Glue and screw in place using PVA woodworking glue and Number 8 by 65mm self countersinking wood screws. Use two screws where each leg crosses the top and centre support rails (refer figure 3). Make three of these leg and support assemblies.
The next step is to join the three leg assemblies using the Centre Rails (H). These centre rails are to be fitted tightly under the Table Top supports (A) and the ends flush with the legs of the two end assemblies and the centre leg assembly is fitted exactly over the centre of the rails. Screw and glue in place. Now the three Table Top pieces can be fitted. First fit one piece exactly in the centre of the Table Top supports and fix with glue and screws (two in each junction). The two outer pieces are fitted 25mm away from the centre piece leaving a gap between all three. Finally fit the bench seats (B) to the Bench Seat supports using a centre mark on the seats to line up with the centre supports using screws and glue as before.
Finish off with paint or wood stain to suit your own style.
All sizes can be altered to suit your own requirements, you can even scale down to a children’s size table.

Join the Discussion
Type out your comment here:
You must be logged in to post a comment.