


One of the great things about roses is that they are easy to propagate by cuttings. It is a great way of growing your own roses and although a lot has been written about growing cuttings successfully, it always come back to a few key steps. If you have your own methods that works for you, that is great but read on if you are keen to have a go.
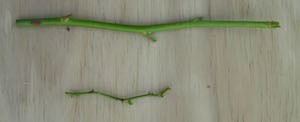 The first step in growing cuttings is selecting good growth from roses. It should be current seasons growth and about the thickness of a pencil, although naturally will be thinner for miniature type roses.
Ideal length for large rose (top) and miniature (bottom)
rose cuttings
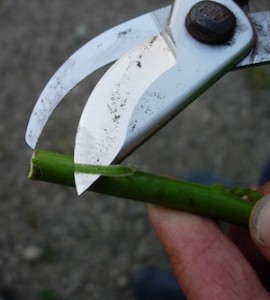
Use sharp secateurs to take your cuttings which should have 3-4 growth buds along the stem. Make a slanting cut above the top eye and a flat one below the bottom bud. That way, you know which way to plant the cutting. It is best to plant cuttings straight away but if you can’t wrap them in a damp paper towel and then into a plastic bag into the fridge. The key is to keep them moist and not dry out.
Before planting your cuttings, there are some things you can do to maximise the chances of roots forming. One is to remove all the foliage off the cuttings but do not remove any thorns. The main reason why cuttings fail to grow is that they dry out and anything you can do to minimise this should be done.
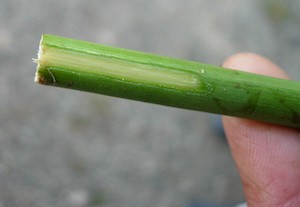 Wounding your cuttings also helps as this helps to expose more of the cambium layer – this is the area where the roots will actually be produced from and is light green in colour. Take some secateurs or a sharp knife and slice 1 – 2cm of skin from your cutting, just one slice is all that is needed. You can also apply a rooting hormone to hasten the formation of roots or even use things like honey, icing sugar or aloe vera.
After wounding, note the light green colour of the cambium later.
Wounding with secateurs or knife helps to expose the
cambium layer which is where roots form from.
You can plant cuttings either into pots or directly into the garden. If planting in pots, make sure they are clean with drainage holes in the bottom. If drying out is the main cause of losing cuttings, the second is that they are too wet. Fill with a mixture of sand or pumice and don’t add any fertiliser. You want the roots to go out looking for food.
Plant your cuttings so that one of the middle buds is at soil level, firm around them and water in well. Place your pots somewhere out of direct sunlight and sheltered from strong winds, preferably somewhere where they won’t be forgotten!
Write a label with the name or flower colour/type and the date, china graph/wax pencils work best as they won’t fade like marker pens.
If planting cuttings in the garden, choose a spot that is free draining, sheltered from wind and not in direct sunlight. Add some sand to where you are planting cuttings to assist drainage.
It can’t be emphasised enough that the main reason cuttings fail to grow is that they dry out. They need to be kept moist at all times but not get too wet and rot. You can put a plastic bag over the top of pots making sure it doesn’t touch the cuttings to maintain high humidity.
Be patient! Cuttings can take anywhere from three weeks to three months or longer to form roots and it doesn’t help if you keep pulling them up to see if they have formed roots. New roots are very fragile and break easily. The presence of growth on the top doesn’t always mean the cuttings have grown roots either.
Once the cuttings have formed roots, they can be transplanted carefully into larger pots or into the garden, again keeping them well watered.
Some varieties of roses will form roots easily especially some of the floribundas, miniature type roses and heritage roses. Others you may find do not like some of the Hybrid Teas.
Be aware also that many of the newer rose varieties on the market are protected by Plant Variety Rights (PVR) which should be stated on the label or you can do a search at www.pvr.govt.nz. This is a form of protection for propagation rights and that any unauthorised propagation is not allowed.
In the Rose Garden for January/February:
– Water, water, water and more. If it is dry, keep your roses well watered. One, good deep soaking a week is preferable to a light flick with the hose every few days.
– Keep up the de-heading (removal of spent blooms) as it encourages new blooms to be produced and keeps the garden tidy too.
– Towards the end of the month and into February, it will be time to give your roses some fertiliser to keep them going. Any rose fertiliser will do at the recommended rates on the packet.
– Evaluate how your roses have done and start thinking about any new ones you wish to purchase in the winter. Believe it or not, many garden centres would have already done their winter rose orders so it pays to get in early with yours or you can miss out.
– Take some time to enjoy your roses and bring some blooms inside to enjoy in a vase.
By Hayden Foulds. Read more here.

Join the Discussion
Type out your comment here:
You must be logged in to post a comment.