


Microsoft Word is quite an easy programme to use, but there are lots of ways that many people never get to find which can make it even easier.
Selecting | Bold/Italics | Cut/Copy/Paste | Formatting | Quick Keys | Toolbars | Bullets | Tabs | Tables
Tabs
So far we have covered methods of selecting and formatting text. Microsoft Word is a very powerful tool and you can do much more than just typing letters or notes.
A common thing to use Microsoft Word for is to create lists such as this:
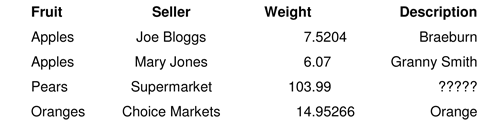
Notice several things about this list. The first column is left aligned, the second is centered, the weight column is centered on the decimal and the description is right aligned.
The way many people do a list like this is to use the TAB key several times to move to roughly where they want the column and then use the space bar to finally align them. NO NO NO NO NO do not do that!!!!! It is hard work and if you change the font or font size there is a good chance it will go all over the place!!
Here is the same list done like that. Turn on the Show/Hide button ![]() so you can see the formatting marks.
so you can see the formatting marks.
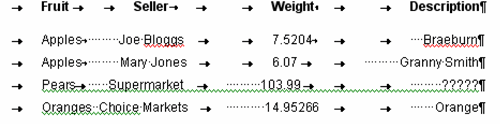
Notice all the TABS and spaces. And if you change one to the left you will have to change all the ones to right as well How tedious.
OK, now let's see how to do it properly.
First make sure your Ruler is turned on. Can you see something like
![]()
across the top of your page? If not click on the View menu and make sure there is a tick beside the Rulers option. If there is not, just click on Rulers

Now you have the ruler showing you can easily put your own TAB stops in wherever you want. In the example above I inserted TABs at the following points:
- Left TAB at 2 cm
- Center TAB at 5.5 cm
- Decimal TAB at 9 cm
- Right TAB at 13 cm
Now to do it. Make sure you are on a blank line in your document. To insert the above Left aligned TAB, take your mouse and point to the 2 cm mark on the ruler. A TAB marker will appear. That has set your left aligned TAB easy isn't it?
For the other TABs, look at the very left hand side of your ruler bar. You should see the same sort of TAB Indicator. If you click on this Indicator it will change to
![]() which is a centre TAB then if you click again it will change to
which is a centre TAB then if you click again it will change to
![]() which is a Right aligned TAB. Click again to see
which is a Right aligned TAB. Click again to see
![]() which is a Decimal TAB
which is a Decimal TAB
If you carry on clicking you may see other options but we won't worry about them here.
Click on the TAB indicator till you see a Centre TAB and then click at 5.5 cm on the ruler.
Change the indicator to a Decimal TAB and click at 9 cm on the ruler
Then change the indicator and click at 13 cm on the ruler. This has now set your TABS
Now press the TAB key and your cursor will jump to the first TAB stop. Type your first data (I had "Fruit" but you can put what you want). Now press the TAB key again and the cursor will jump to the next TAB stop at 5.5 cm. Type something and notice that it is centered
Repeat this with each of the TAB types indicated above. When you get to the end of the line, just press Enter for a new line and you will see your TAB stops are carried forward, then type the first row of data, pressing TAB between each entry and press Enter again at the end of the line. And so on.
If the TAB is not in the right place you can place your mouse pointer on it, hold down the left hand button and drag it to where you want it.
NOTE: WHEN YOU DO THIS IT WILL ONLY AFFECT THE LINE YOU ARE ON
If you want to affect multiple lines of data select them all first.
If you put in too many TABS or the wrong type, simply point to them and darg them down onto your document to delete them.
And that's about all you need to know about basic TABs.

- 12 years ago
The Windows tips are great, I did know them once but with disuse were forgotten. However, I did not find the “Lost Files” any help. I have used the “Saved As” but from then on they are lost. Also the Favourites are not easy to find. I would very much appreciate help with these two matters. Thank you, Irene