Extracted with permission from Wood Carving: Tools, Techniques & Concepts by Stephen Myhre, published by Oratia Books, $49.99 paperback. Available from good bookstores countrywide.
It has been a long time since I was first aware of the cabinet scraper as a distinct tool from what is now an old technology mostly used in making furniture and joinery. The first time I used one was when making furniture from recycled native wood in Wellington in the mid-1970s.
I discovered my first scraper tool in a second-hand shop, and although at the time I didn’t know what it was for, I recognised it as something I should investigate. Until that point I had sometimes used broken glass for scraping old varnish and paint when restoring furniture, but that is not as reliable as a well-prepared metal cabinet scraper blade. It is a tool that has largely fallen out of use in the age of power tools, in particular the belt sander and electric plane, but with care and attention to the edges you can make very impressive surfaces, in a realistic time. These can then be sanded with fine sandpaper — missing out the coarse and medium stages — so it is well worth the effort to get the edges right and do the necessary amount of sharpening that can blunt the efforts of the less determined woodworker.
I was very pleasantly surprised with the results when working with recycled rimu. Most of the work I did with the scrapers at the start was to make surfaces flat, especially tabletops, and deal with knotted, twisted and cross-grained wood, which sometimes happens. The scrapers move well across the grain and even against it while removing very thin shavings.

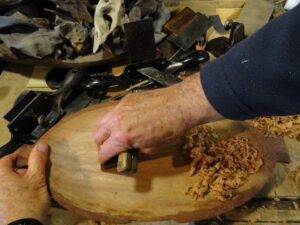
After a while I left the furniture behind, as straight lines and square shapes were a bit limiting, but I took what I had learned with the scrapers and applied it to the curved surfaces of my wood sculpture, particularly the concave surfaces of the interior of my canoe forms. This meant I had to take the blades out of the handle and use them totally by hand.
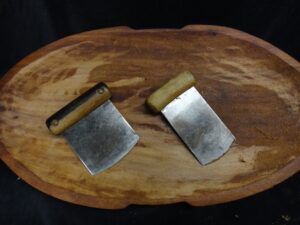


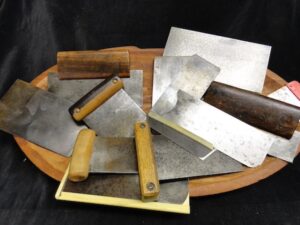
A number of my second-hand shop scraper finds had wooden handles and I have made handles of my own to hold some of the blades (Figure 79). Working with unguarded edges can be very fatiguing, and sometimes injurious, for the hands. I have always had high respect for hand tools, but also have spent quite a bit of time making them so they don’t cause my hands too much stress or damage. My hands are perhaps my best tools, and they need to be considered if one wants to have a long working life and still be in touch with the materials and the work.
Making scrapers
The steel for the scrapers needs to be tempered to a degree of hardness whereby the edge is strong enough, but not so hard that it is too brittle and resists bending over into the hooked profile. I made some scrapers out of bits of an old and large bandsaw blade that I found in a second- hand shop. After cutting it with a hacksaw I ground the pieces to shape and then had to temper them with a gas torch. It took quite a bit of experimenting to get the temper right, but like a lot of other things it was worth the effort.
Another source of scraper blades is old panel saws. Cut them to shape using the toothed edge as the final working edge, as this is the tempered part of the blade.
Sharpening scrapers
The cabinet scraper is usually a thin square or oblong piece of spring steel. There are a couple of ways of creating an edge on it, but the method that I use the most is first to sharpen a high quality, thin edge on one end of the blade, as sharp as if it was a plane or chisel. I then burnish the edge with a polished piece of hard steel, using repeated strokes and increasing the angle with each pass. This gradually turns the edge over into a hooked profile so that the tool can be dragged backwards along the wood. This is perhaps counterintuitive as most blades are pushed forward to cut. The edge shaves off a very thin layer. The swarf should be in a crinkled roll if the tool is working well (Figure 83). The sharpening time can be reduced by using mechanised abrasive technology, such as the gear I run in the point carver.
The edges are quite thin, can be fragile and become blunt quickly, particularly if the knots are hard, that is, if they contain resins, or the wood is naturally abrasive, such as teak.
Another method of sharpening a scraper is to file the edge at right angles, so that you rub some of the metal over the edges and create a rather rough scraping edge on each side. These edges mostly remove material in the form of dust or particles.
Curved scrapers
Another great thing about scrapers is that they can be shaped to many different profiles, and though they come from the flat and square traditions they can still be very good tools to ensure a fine finish on a curved surface, and especially inside concave forms that may be too tight for ordinary, square blades to reach. If used well, they can reduce the surface from the gouge chisel stage to a flush curved surface with a little work and in a reasonable amount of time.
The blade in Figure 85 is fitted into the slot and tightened so it won’t move — with two screws, one on each side — then an adjustment thumbscrew in the centre of the other side is tightened so the blade is bowed slightly. This gives very fine control of the cutting depth: the more the adjustment screw is turned, the deeper the cut.
Fine cutting
Scrapers are very good at cutting a fine shaving off the surface and are the best thing to finish a chiselled surface or leave it ready for fine, final sanding. Scrapers used carefully can thus reduce the amount of sanding that is necessary and at times it is possible to go directly from the scraper to 320 or even 600 grit, which means a considerable saving in time and sandpaper.
Sanding
It is all very well to use a good sanding machine to do a lot of this work, but I have found that machines often cut too much too quickly and sometimes leave bad track marks from improper use. Also, it’s easy to have accidents with machines. A quick going-over with a scraper after sanding will also give a good surface, so if the sanding is coarse there is a saving on sandpaper that is not to be overlooked.
Removing varnish
A cabinet scraper is very good at removing old varnish and taking a minimum of wood with it. The most complicated scraper is actually called a veneer scraper and can finish the thinnest veneer to varnish-ready.
The different shapes I have developed can get into those hard-to- reach places, all the while with much better control of the surface.
Knots
One of the great advantages of the scraper is that it will cut against the grain and over knots without pulling out wood fibres the way a plane blade does. Even a very sharp plane blade can have difficulty with cross- grain and knots. Cabinet scrapers are the best tools to cut down the surface of highly featured wood with twisted, complex grain structure to prepare it for finishing.
Cabinet scrapers are also great tools for reading grain patterns in wood. If the grain is even and fine, the surface can still have rings of grain which are rather like a topographical map: the grain can be all over the place. The technique with this is to find the direction of the grain and work with it. Scrapers work well where there are grain crossover points, as the grain can run in opposite directions on each side of a curved formation, but the scraper allows you to work over the centre where the grain changes direction. You can also work up one side of a grain structure and down the other and have clear-cut grain in the centre where the grain crosses over.
The grain structure around knots is usually either an eruption out of the surface of the wood or a vortex that dives into the surface. With the erupting knot you scrape towards the centre; with the vortex knot you work from the centre outwards, but in any direction that is comfortable to get it under control and remove the broken fibres. Flattening tabletops laid up from planks was the job in furniture-making that I liked the most, and once again it is worth the sharpening time to get this much control of a twisted grain surface. This is especially true with wood from the crutch where branches meet, and burl wood as well — all very attractive wood but tricky to work.